NotaryBoard shows you which of your notaries are free before you pick up the phone. Each notary connects their calendar, and you see when they're busy. You never see what they're doing.
When you have a signing, you send it to one notary or to several at once. The first to accept gets it, and a hold goes on their calendar automatically. Everyone else is told it's covered.
NotaryBoard doesn't supply notaries. You invite the notaries you already work with, and it's free for them.
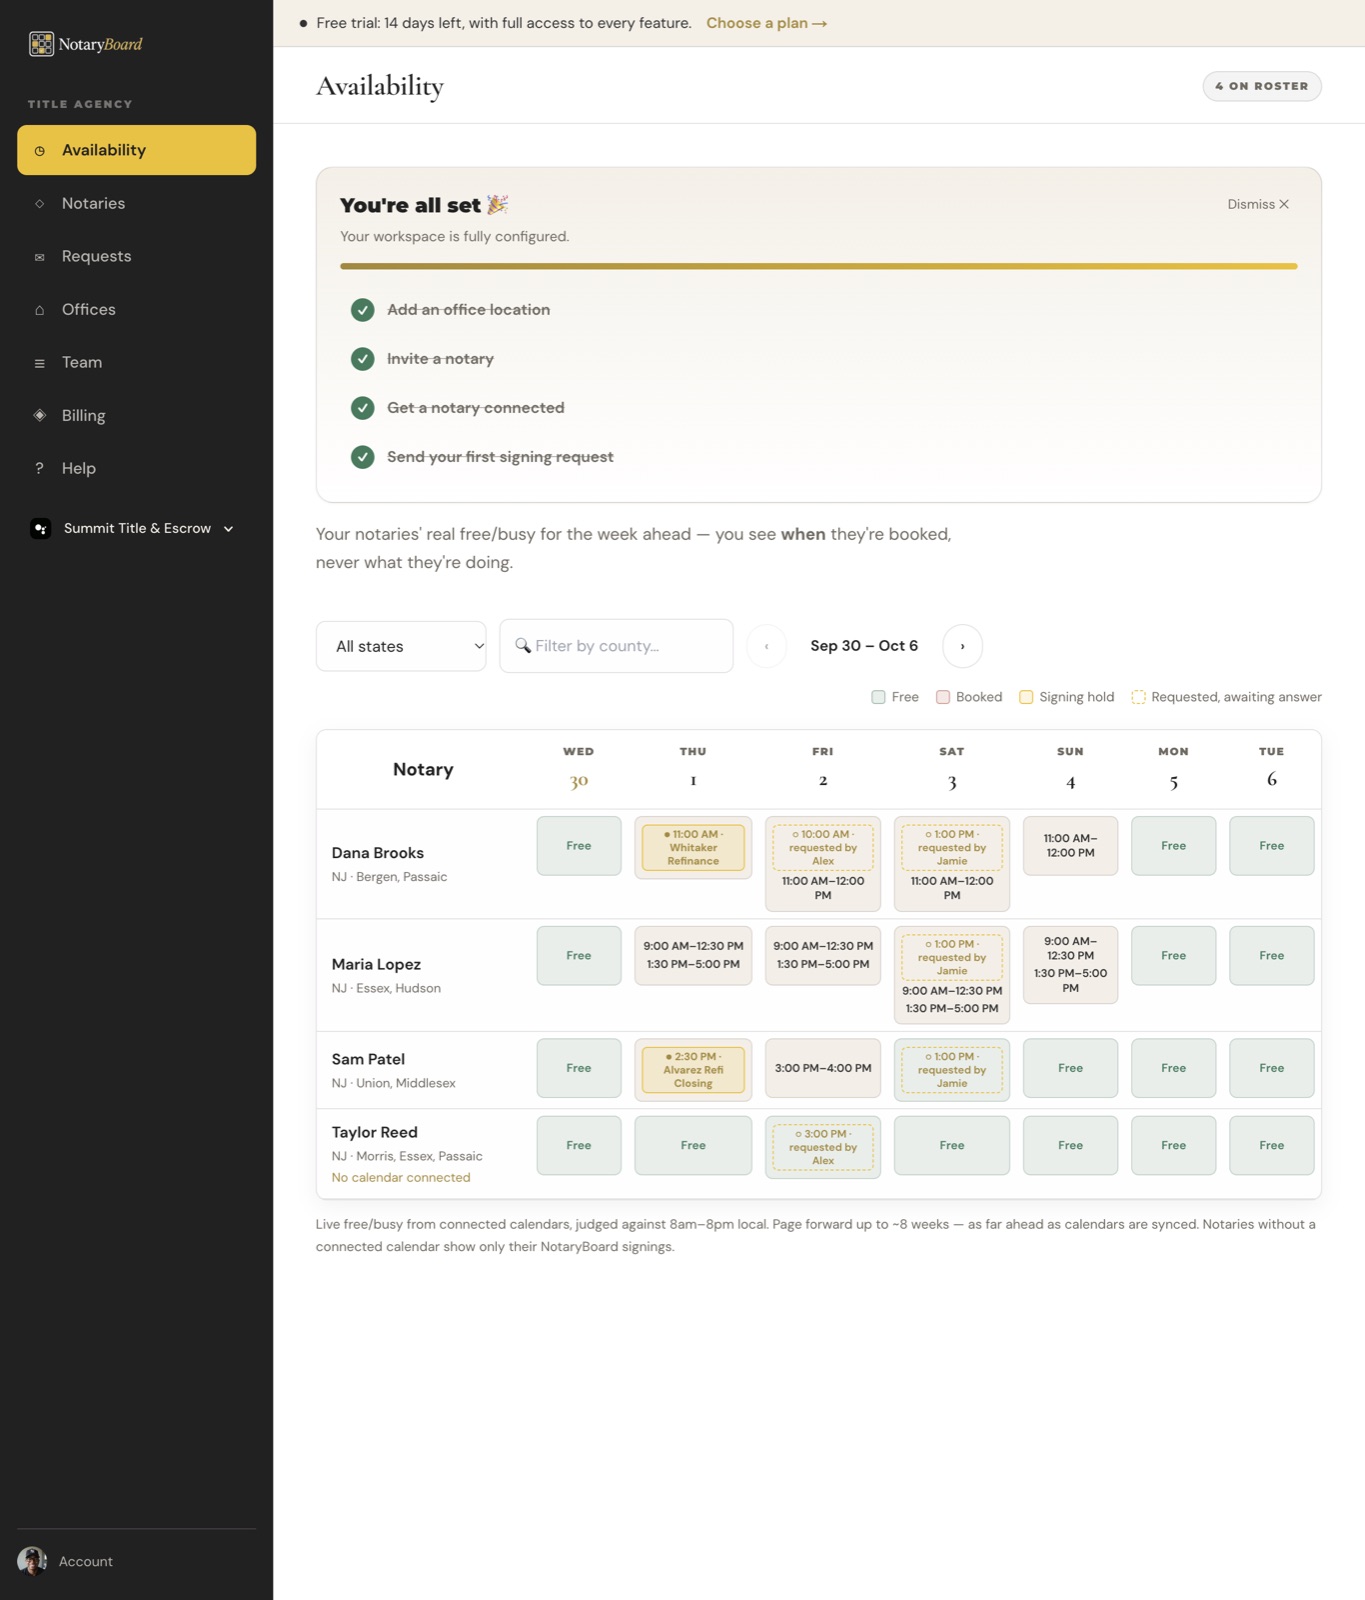
Your Availability page. The checklist at the top walks you through setup.
2. Your first 15 minutes
The checklist on your Availability page tracks these four steps. Each one takes a few minutes.
Add your office locations (Offices).
Invite the notaries you already use (Notaries).
Wait for at least one notary to connect.
Send your first signing request (Requests).
Rather have us do it? Click "Want us to set it up for you?" on your Availability page and send us your notaries, offices and staff. We'll build your board for you.
3. Add your offices
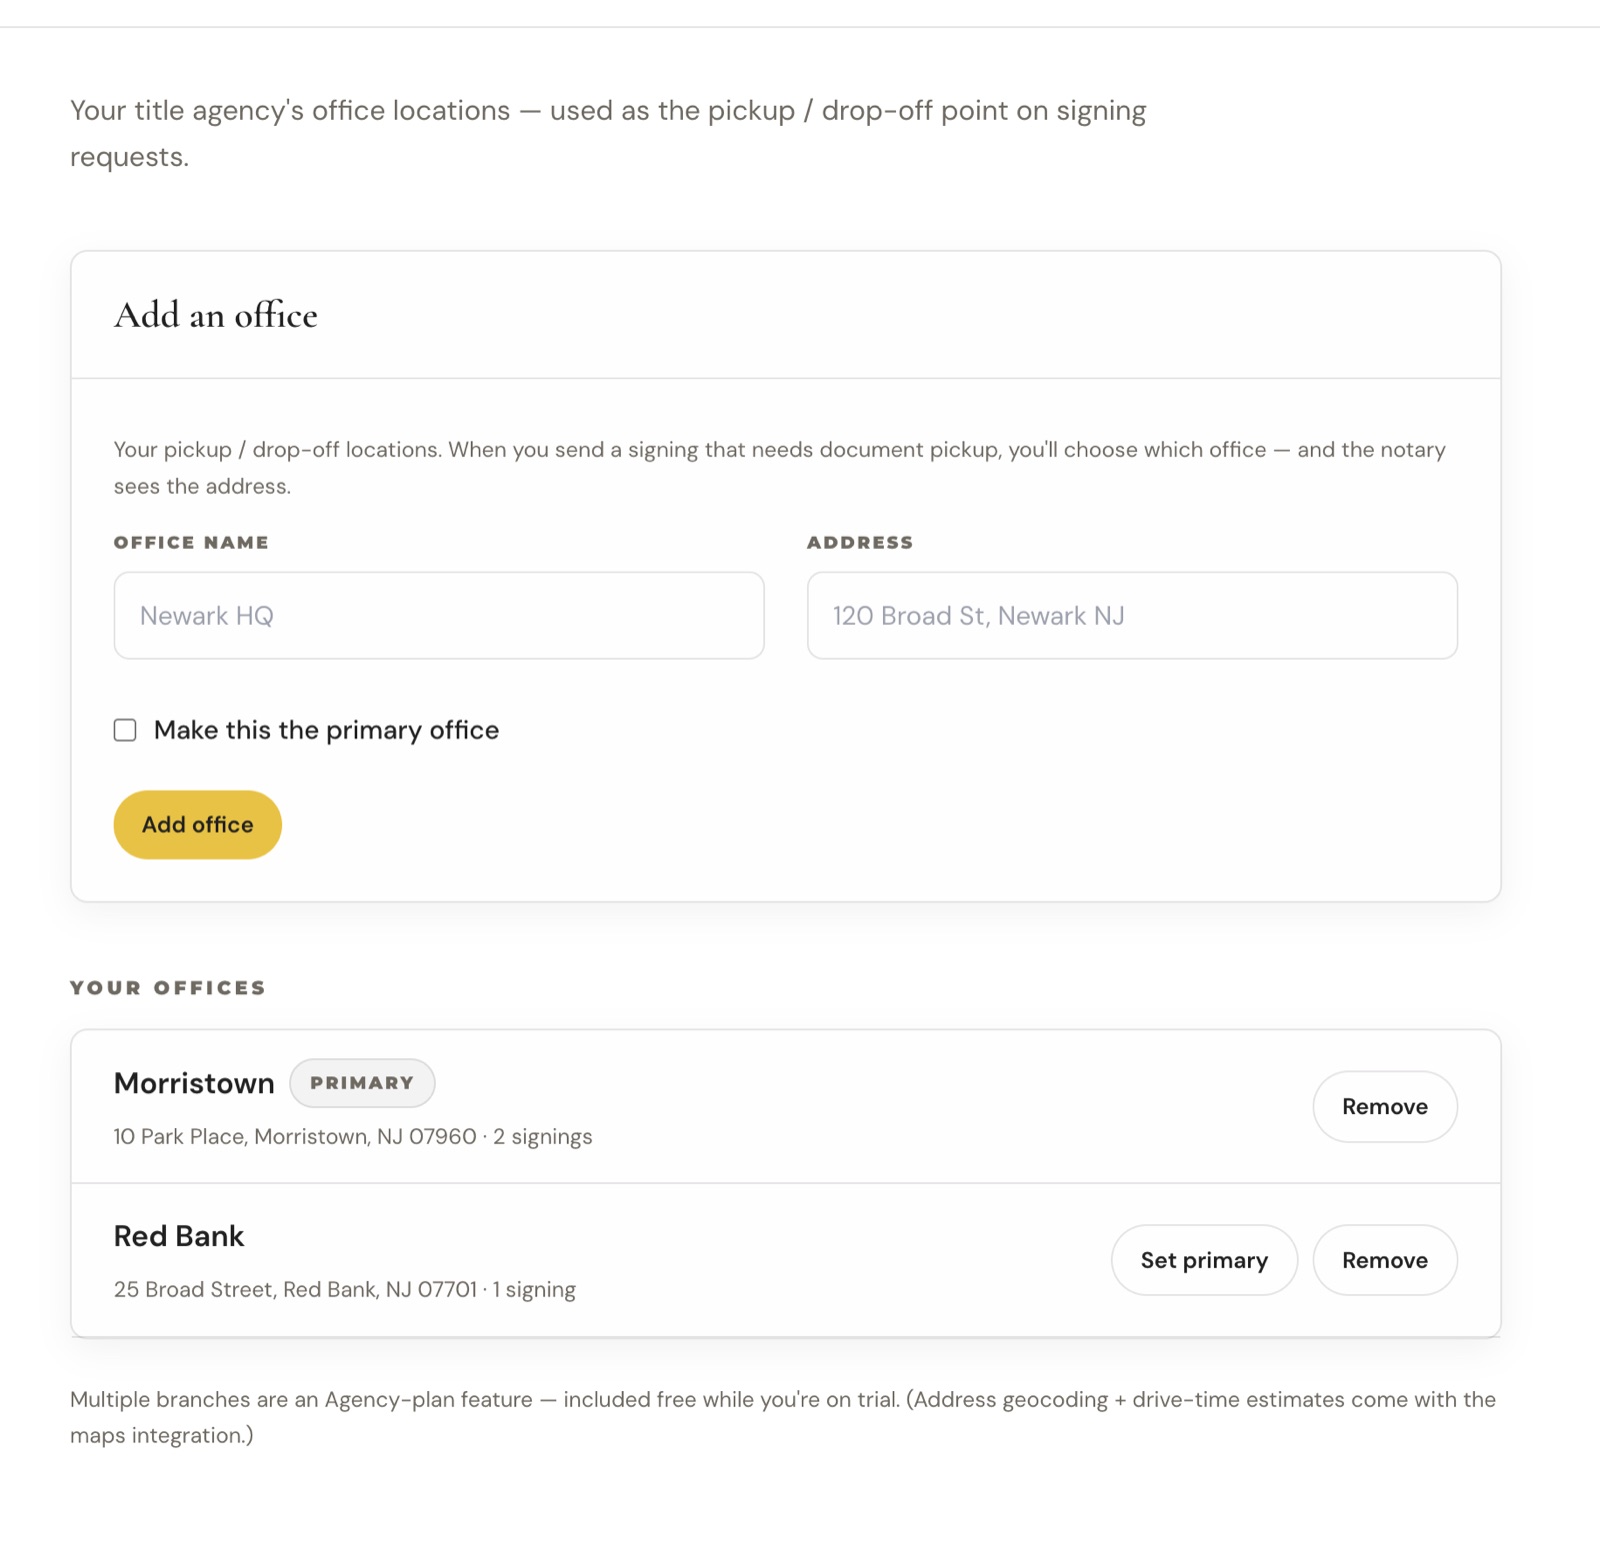
Offices are where notaries pick up and return documents, and where in-office signings happen. When you send a signing, you pick the office and the notary sees its address.
Open Offices in the sidebar.
Enter the office name and full address.
Tick "Make this the primary office" for the one you use most. It's picked for you on new requests.
Click Add office. Repeat for each branch.
More than one branch is an Agency plan feature ($299/month). It's included while you're on your free trial.
4. Invite your notaries
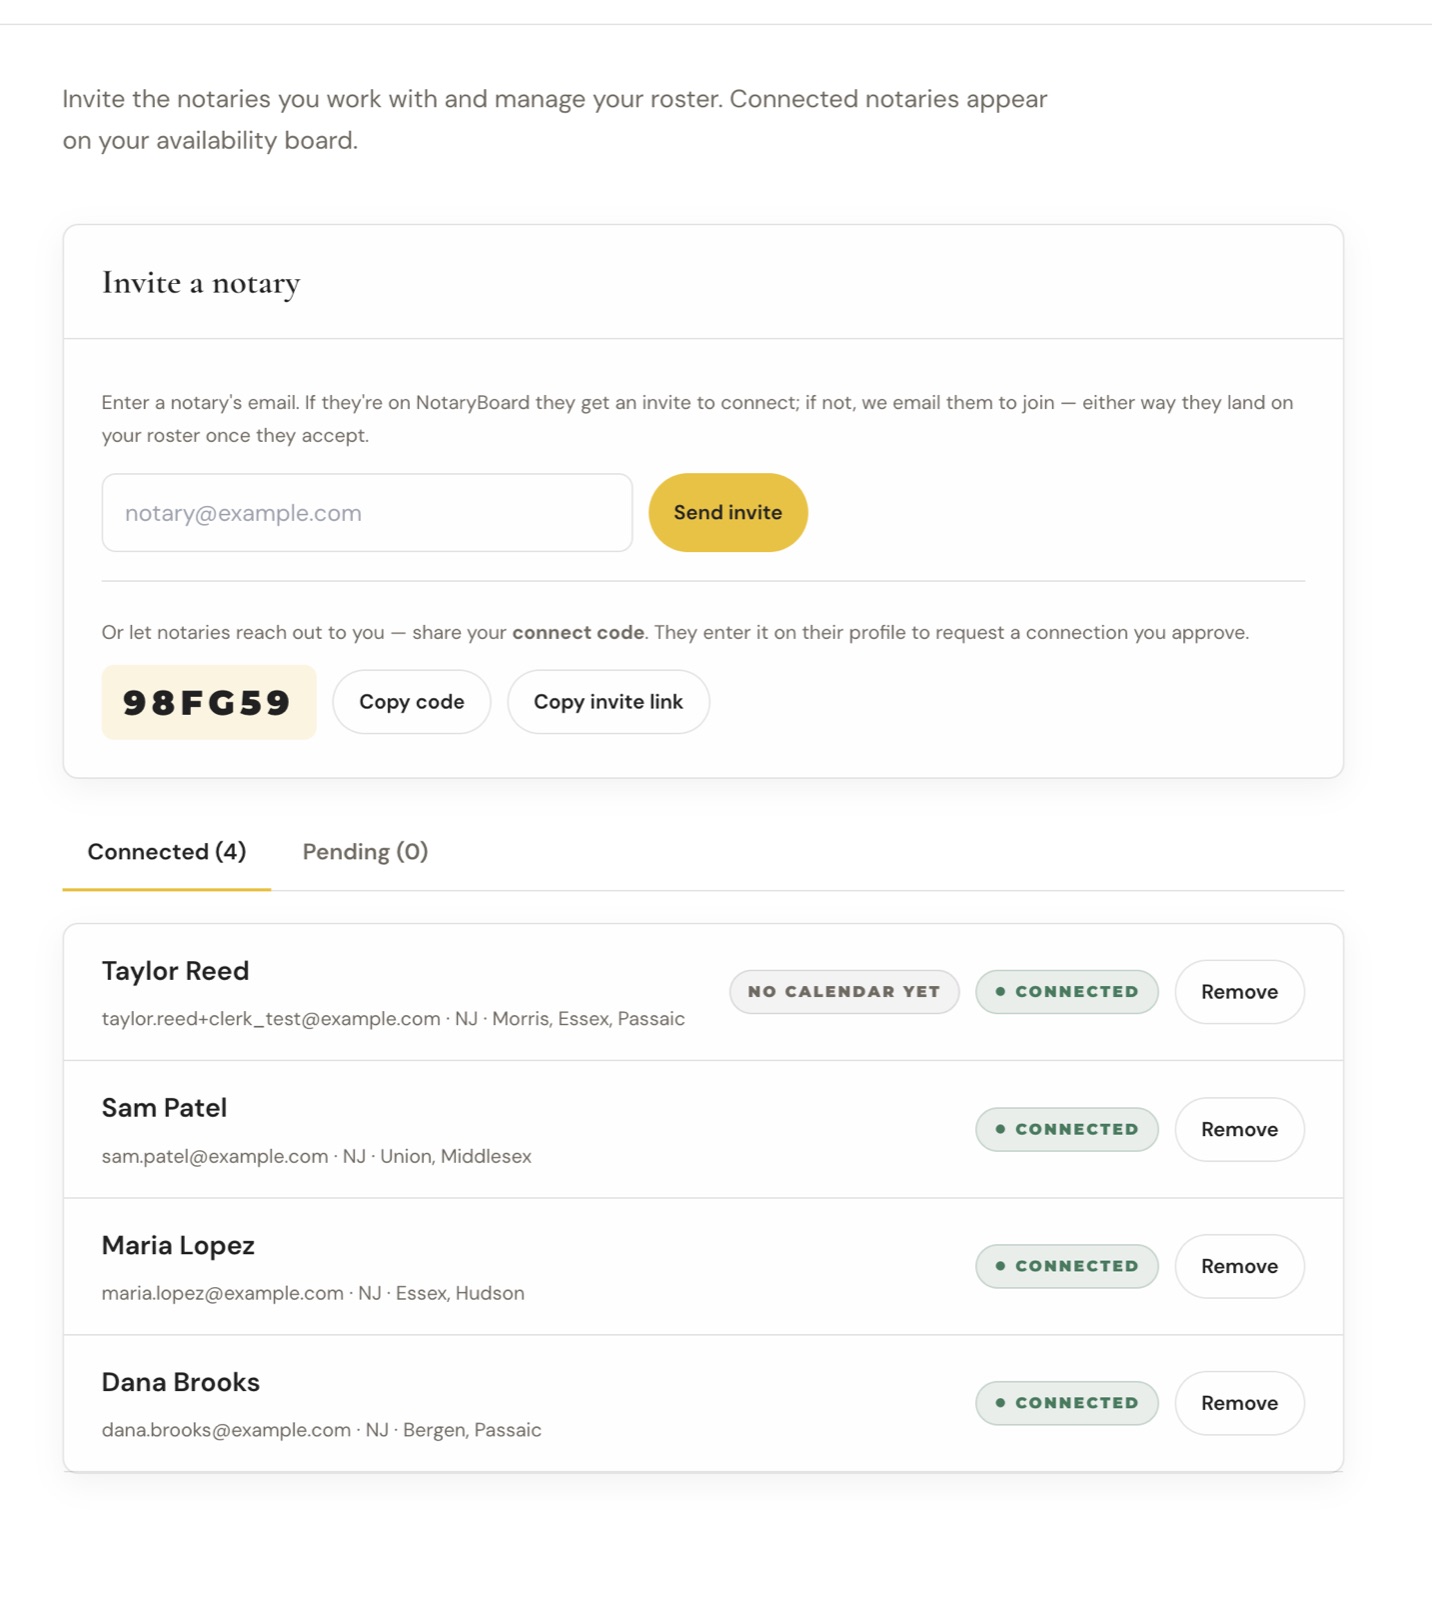
Your board only shows notaries who have connected with your agency. There are two ways to connect them.
By email: on Notaries, type the notary's email and click Send invite. If they're already on NotaryBoard, they get a request to connect. If not, we email them an invitation to join. Either way, they land on your roster once they accept.
By code: copy your connect code (or the invite link) and send it to your notaries. They enter it on their profile, and the request shows up under Pending for you to approve.
Connected shows everyone on your board. Pending shows invites and requests still waiting.
The Starter plan connects up to 10 notaries. Pro and Agency are unlimited.
5. Read the availability board
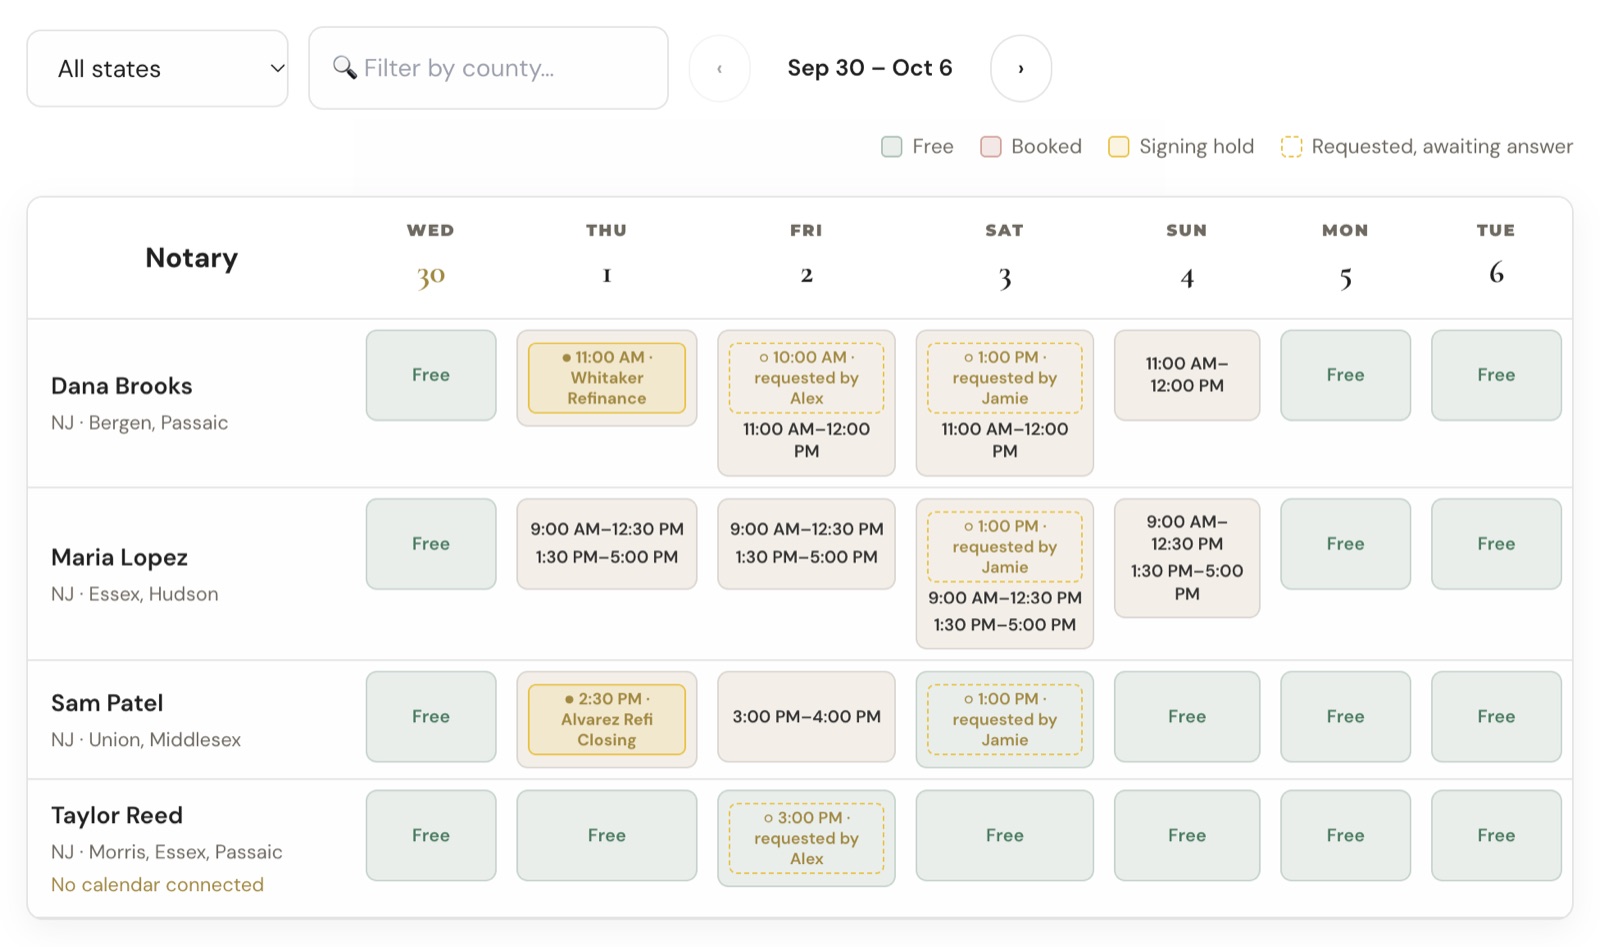
The board shows every connected notary for the week, one row each. It's judged against 8 AM to 8 PM in your time zone.
Free (green): nothing on their calendar that day.
Booked (tan): busy blocks from their calendar, with the times shown.
Signing hold (solid gold): a signing your agency sent that the notary accepted, with the time and the signing's name.
Requested, awaiting answer (dashed gold): a request your agency sent that the notary hasn't answered yet, with the coordinator who sent it.
Filter by state or type a county to see only the notaries who cover it.
Use the arrows to page forward, up to about eight weeks.
"No calendar connected" under a name means the board only knows that notary's NotaryBoard signings. Check with them before assuming they're free.
If a notary also works for another agency on NotaryBoard, that agency's signings show here only as busy time. You never see their details, and they never see yours.
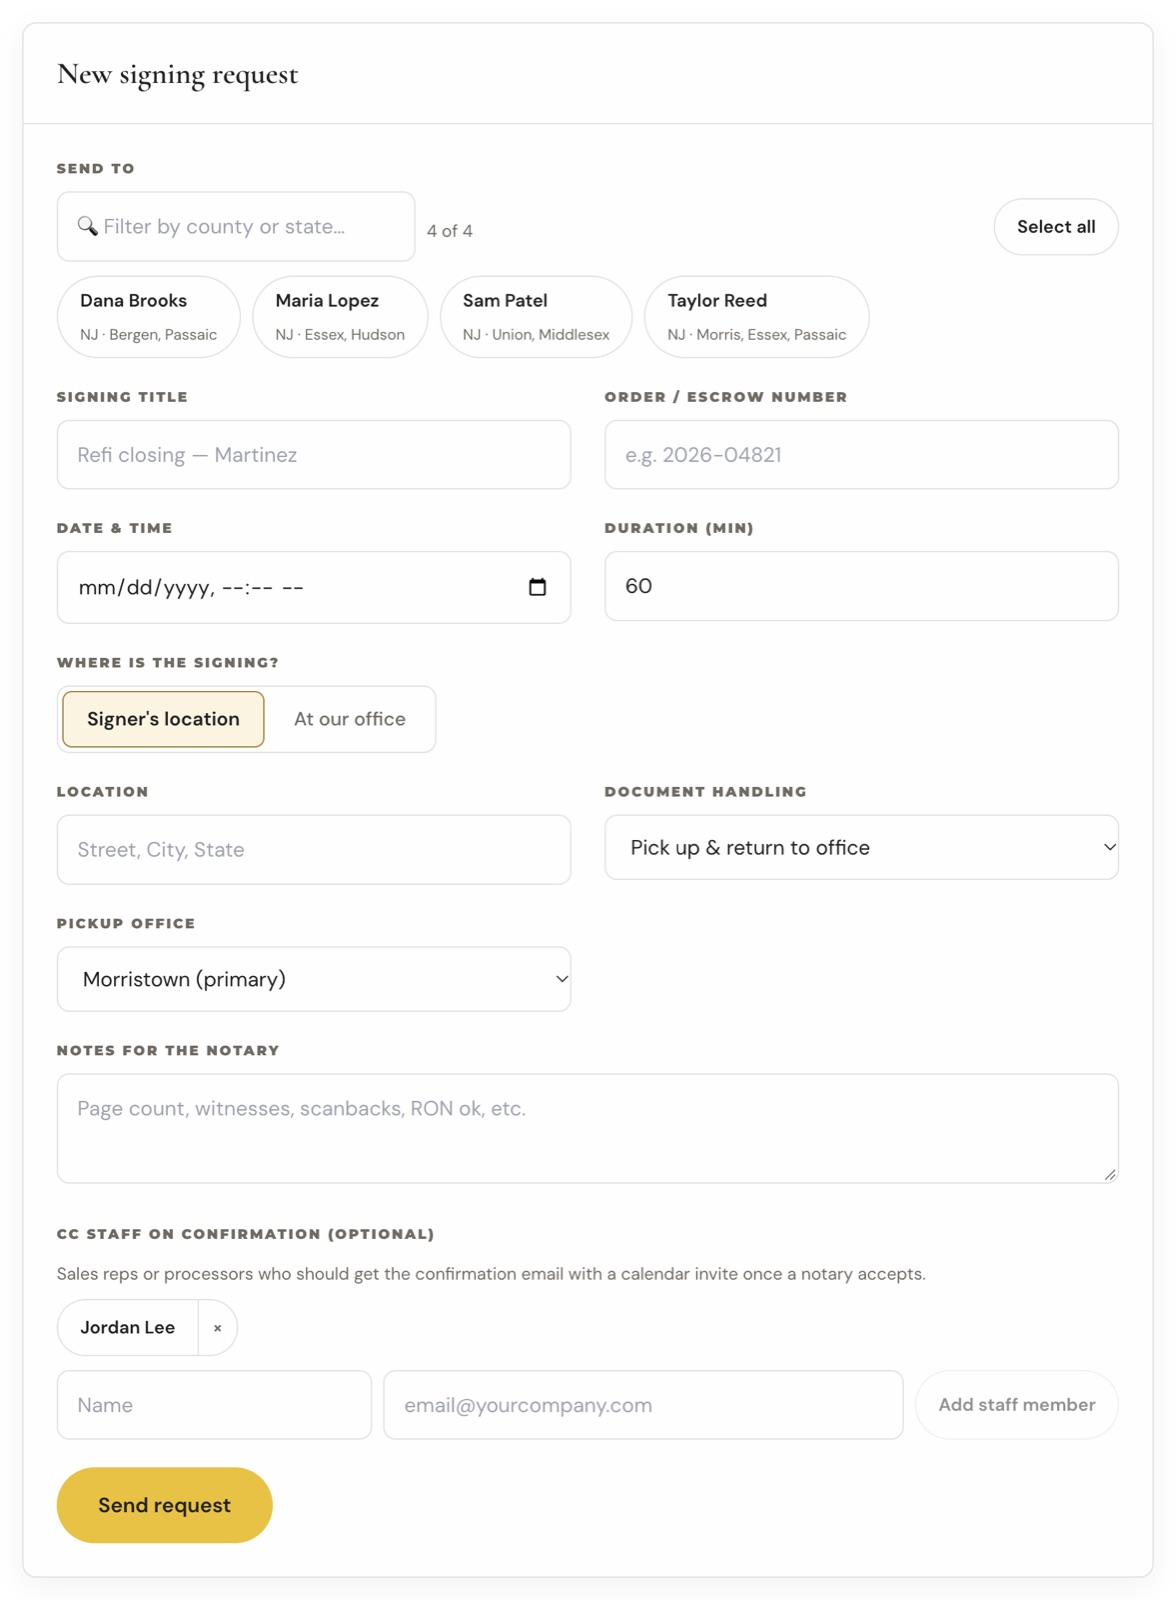
Open Requests. The new signing request form is at the top.
Pick who to send it to. Filter by county to narrow the list. Pick one notary, or several to send it to all of them at once. The first to accept wins.
Add the signing title and order or escrow number (notaries need it to bill).
Set the date, time and length.
Choose where it happens: at the signer's location (type the address) or at one of your offices.
Choose how documents are handled, such as pick up and return to the office, print eDocs and ship back, or remote online (RON). Pick the office for pickup or return when asked.
Add notes for the notary if needed: page count, witnesses, scanbacks.
Optionally tick staff to copy on the confirmation (see below).
Click Send request. Notaries get it by email right away, and by text on Pro and Agency if they've added a mobile number.
If a notary you picked already has a request from your agency waiting for an overlapping time, you'll see a heads up with who sent it. You can still send.
Sending to several notaries at once, and text alerts, are on the Pro ($129/month) and Agency plans.
7. Keep track of your requests
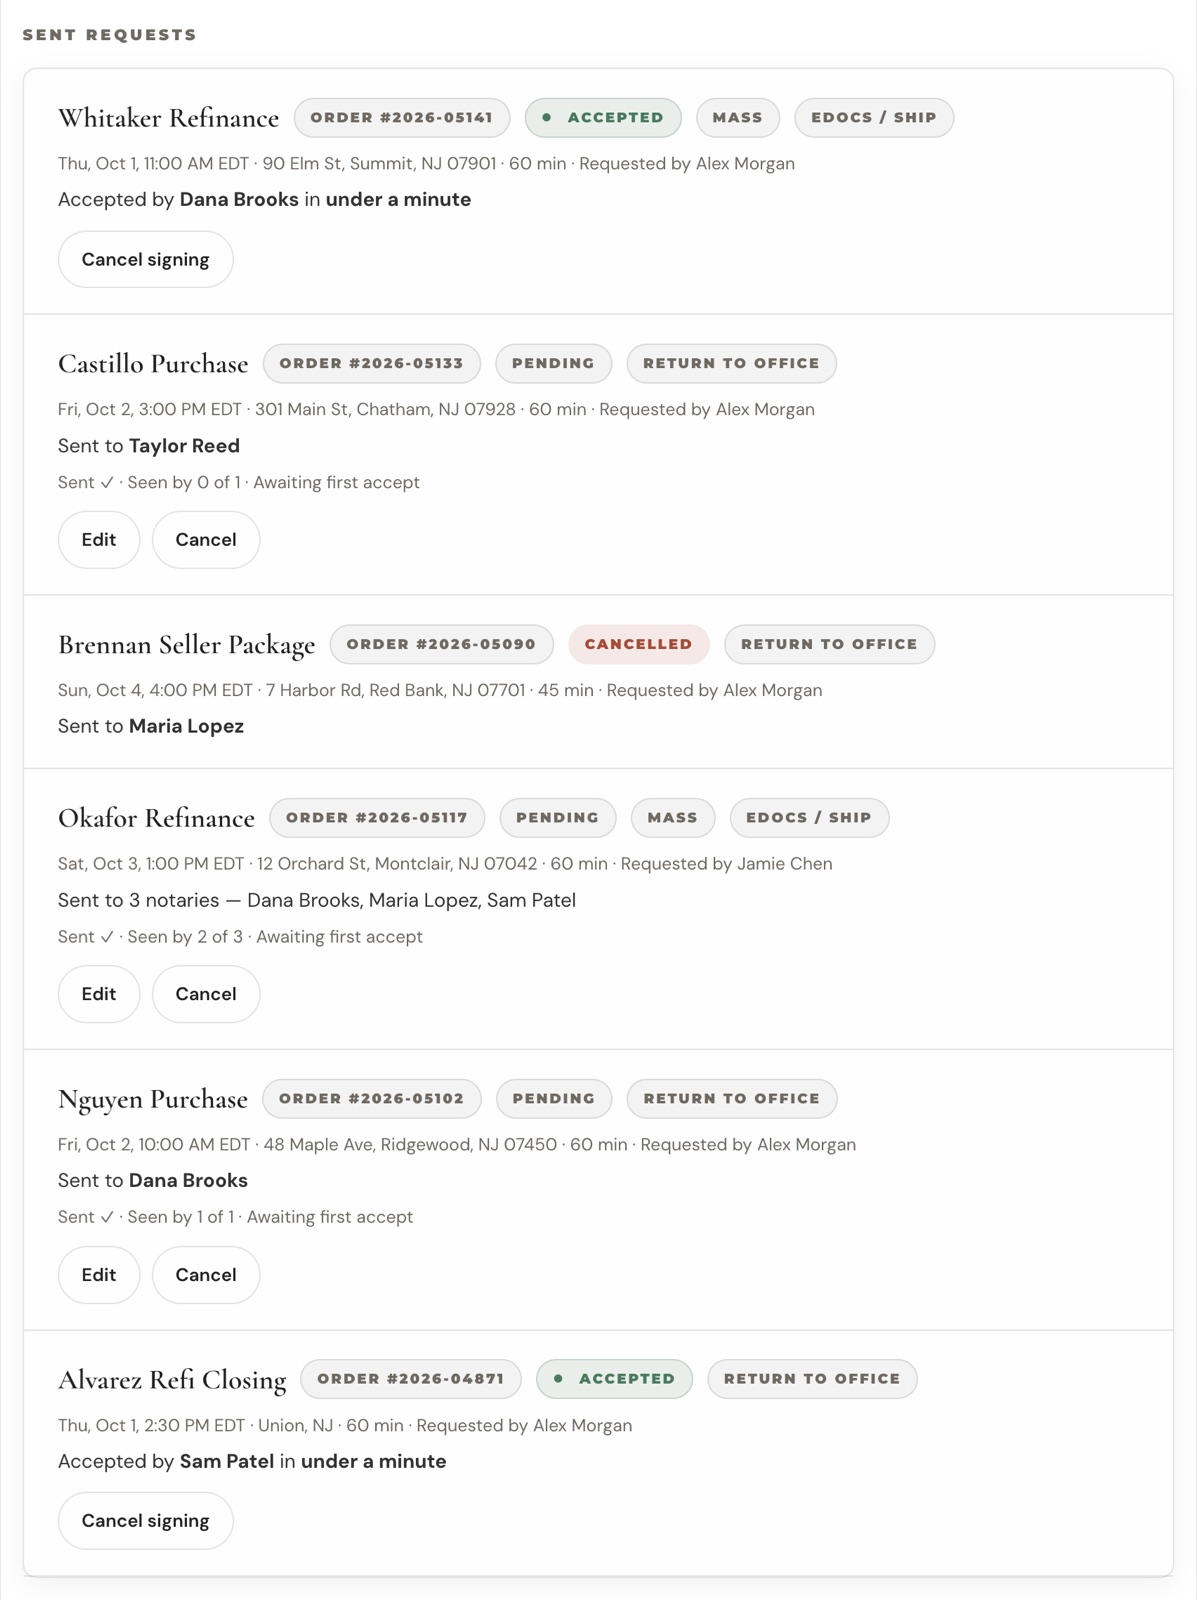
Every coordinator at your agency sees every request under Sent requests, newest first.
Pending: sent and waiting. "Seen by 2 of 3" tells you how many notaries have opened it.
Accepted: shows who took it and how fast. "Hold on their calendar" means it's on the notary's own calendar too.
Cancelled: you withdrew it. The notary is told and the hold comes off their calendar.
Requested by: which coordinator sent it, so nobody asks the same notary twice.
Edit a pending request to change the details. The notaries get the update.
Cancel a pending request, or cancel an accepted signing, with the buttons under it.
Only one notary can accept. If two tap Accept at the same moment, the second is told it's already covered.
8. Copy staff on confirmations
Sales reps and processors often need to know when a signing is set, without logging in. Add them as staff.
In the request form, under "CC staff on confirmation", type their name and email and click Add staff member. They're saved for next time.
Tick the staff who should hear about this signing.
When a notary accepts, each ticked person gets a confirmation email with a calendar invite. If the signing is cancelled, they get a notice that removes it.
Staff don't use a seat and never need a login.
9. Add your team
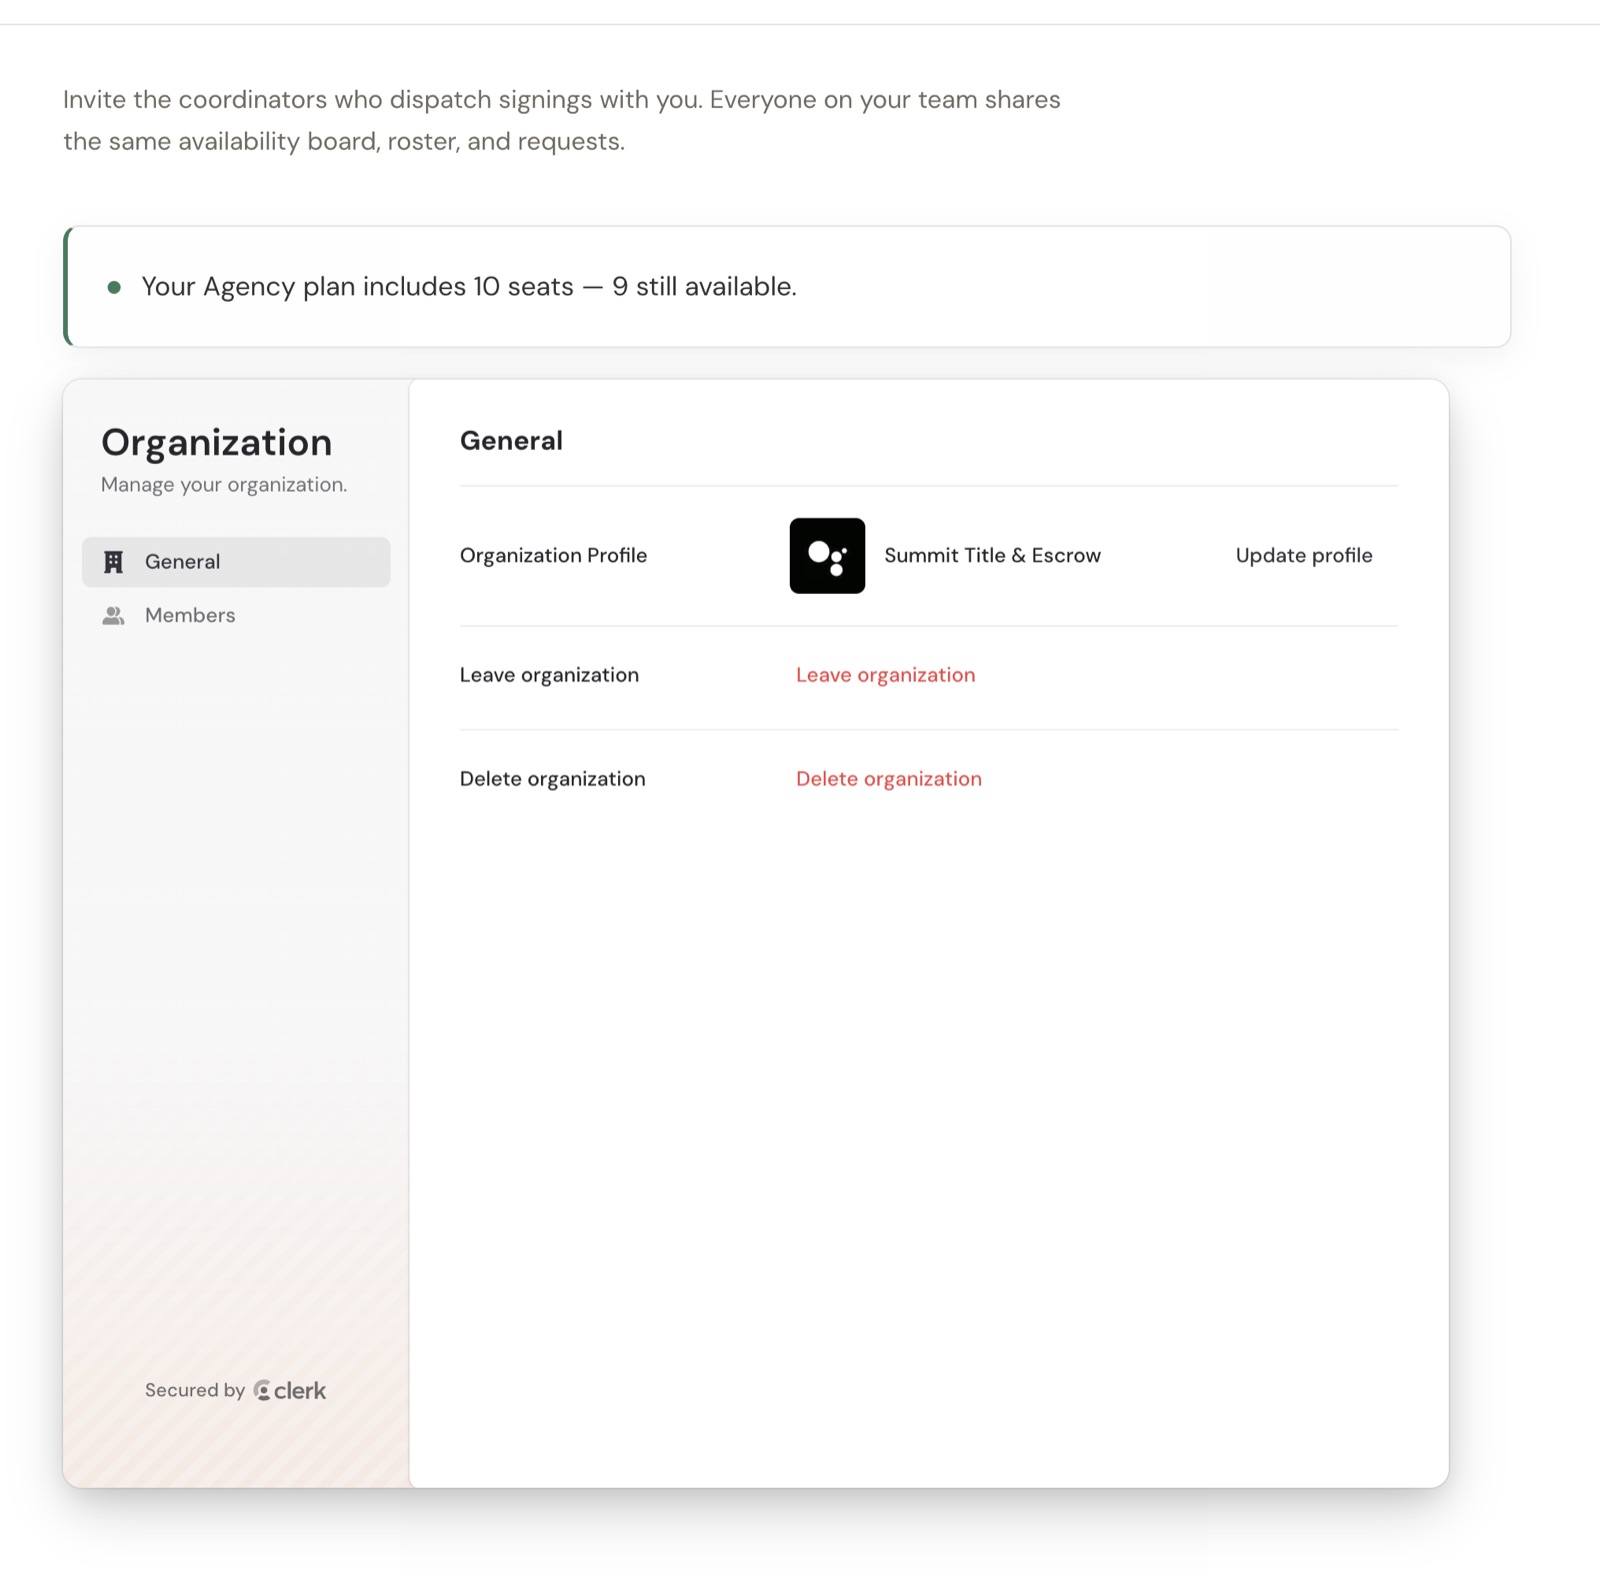
Coordinators who send signings need their own login. Everyone on your team shares the same board, notaries and requests.
Open Team.
Open Members and click Invite. Enter their email.
They get an email, sign up, and land inside your agency.
Seats: Starter 2, Pro 5, Agency 10 and up. The top of the Team page shows how many you've used.
10. Your trial and billing
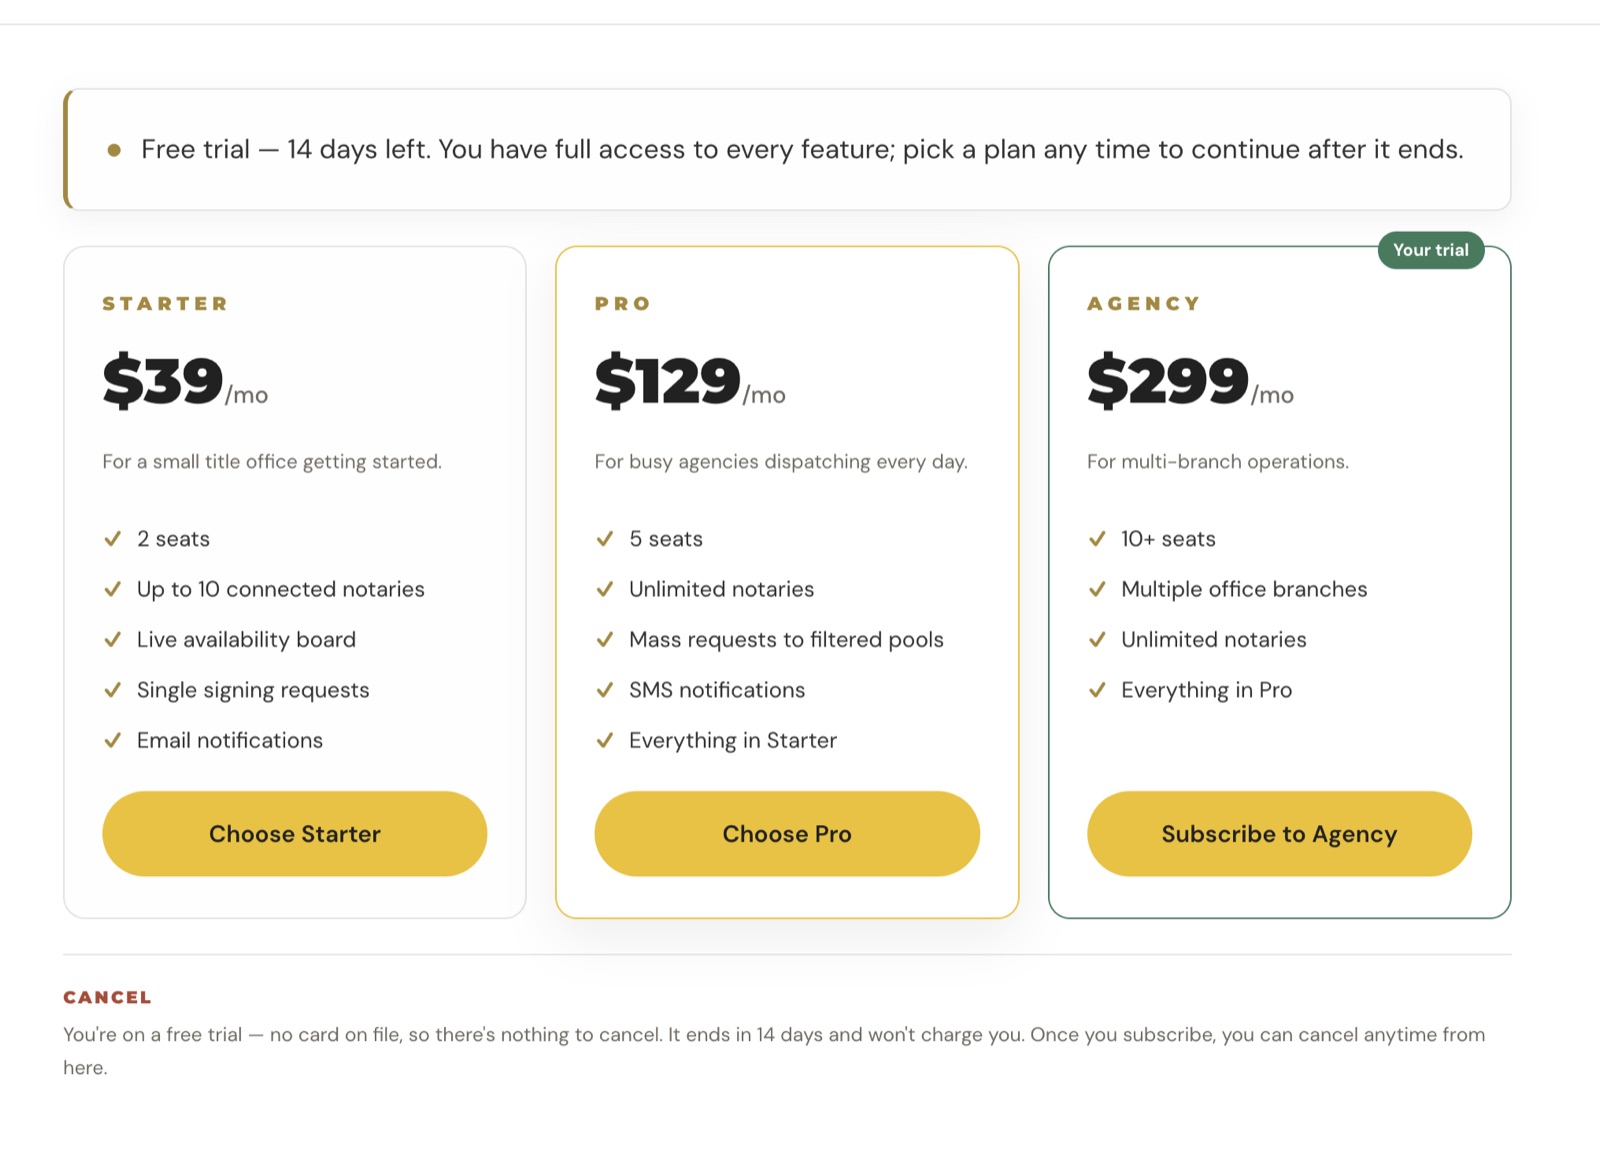
Every agency starts with a 14-day free trial with every feature and no credit card. A banner shows the days left.
Choose a plan any time under Billing: Starter $39, Pro $129 or Agency $299 a month. You can cancel from the same page.
11. Getting help
Click Help in the sidebar, or email support@notaryboard.io. A real person answers.
Screenshots show a demo agency with made-up people and addresses. Questions? Email support@notaryboard.io.